Understanding a tool’s utility is directly proportional to our knowledge of its use. This blog post aims to evaluate the advantages and disadvantages of using Fabric Eventstream & Data Activator with real-world data. We aim to achieve this while minimizing infrastructure requirements and costs.
In essence, this post demonstrates how to implement continuous location data from the International Space Station (ISS) by:
- Setting up an Azure Function in Python.
- Sending data directly to Eventstream, bypassing the need for a dedicated Event Hub.
- Utilizing Data Activator for notifications on specific location changes.
Ultimately, this will allow us to:
- Assess performance, limitations, response times
- Extracting guidance on how to use Fabric
This post is structured into three main sections: an introduction, a detailed walkthrough complete with code implementation, and a closing section focusing on key learnings.
Introduction
The capabilities and potential applications of Fabric are vast and can sometimes seem overwhelming. In this blog, we focus on a real-life example involving continuous data: the location of the International Space Station (ISS). For our purposes, consider the ISS as an IoT device, regularly transmitting its location. Our goal is to ingest this data and send notifications when specific conditions are met.
Utilizing the ISS data serves two primary purposes. Firstly, it eliminates the need to set up an IoT device or create a function for generating sample data points. The data is already generated and accessible to anyone. There is nothing wrong with simulated datasets but real world cases are much more engaging, enable deeper understanding and the data points represent an observable state of our environment – which makes them more tangible. Additionally, the ISS follows a predictable orbital pattern, allowing us to verify the accuracy and latency of our architecture. This recurring pattern allows us to test cyclic events and compare the results over time.
Requirements
The following technologies are used to implement the solution.
- Microsoft Fabric (Trial or Paid)
- Azure Subscription (Free or Paid) to host the Azure Function
- Visual Studio Code with Azure Tools Extension to create and test the Azure Function
- Python 3.9.* to create a local Environment
If you want to follow along:
All requirements are free of cost as the Fabric Trial is available for 60 Days and the cost for running the Azure function used for a limited time is running within the monthly free grant of 1 million requests and 400,000 GB-s of resource consumption per month per subscription Link). You can also use a Fabric Capacity but be aware that Microsoft recommends to have at least an F4 SKU for using Eventstream (Link).
To create the Azure Function locally, you need to have Python installed. In this example, Python 3.9. is used. However, there are more versions of Python which are supported by Azure Functions.
Make sure to delete the resources after you are finished so you don’t incur accidental cost.
How-To
Create A Fabric Workspace with an EventStream
- Navigate to https://app.powerbi.com/
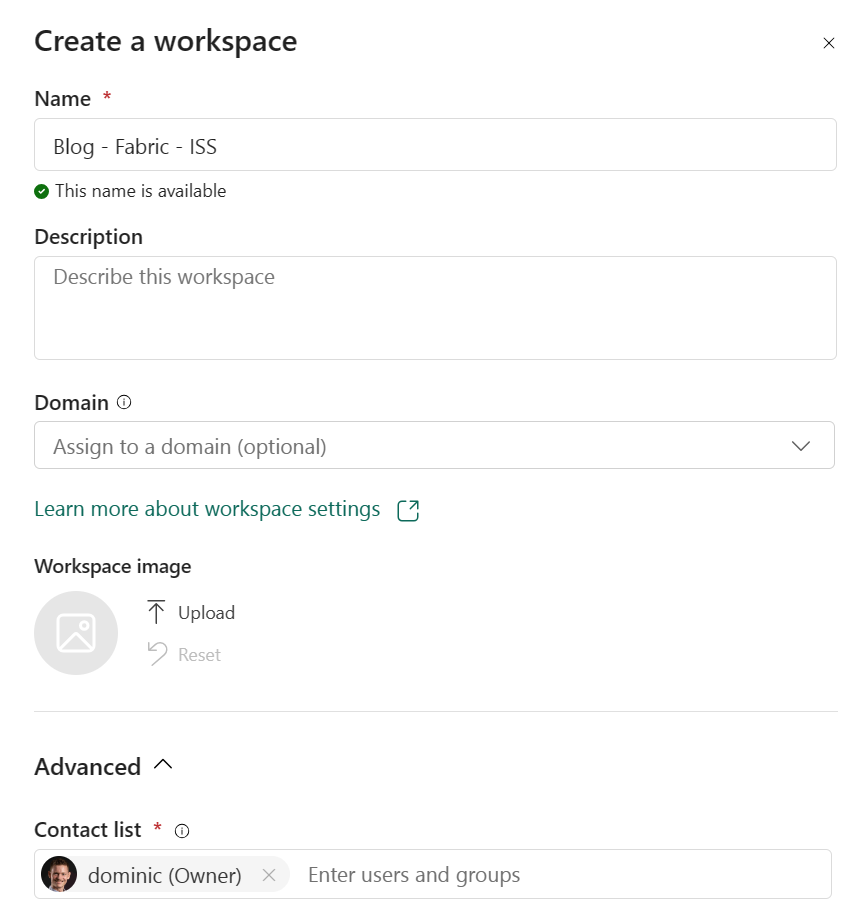
- Create a new Fabric Workspace
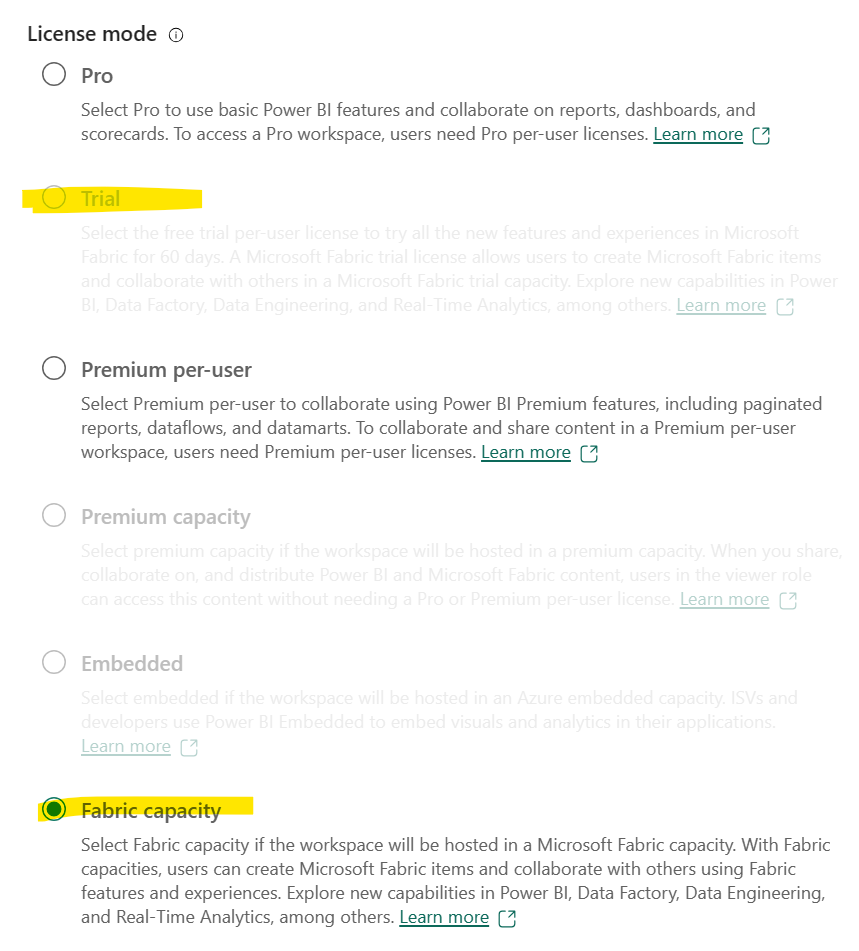
- Select either Trial or Fabric Capacity
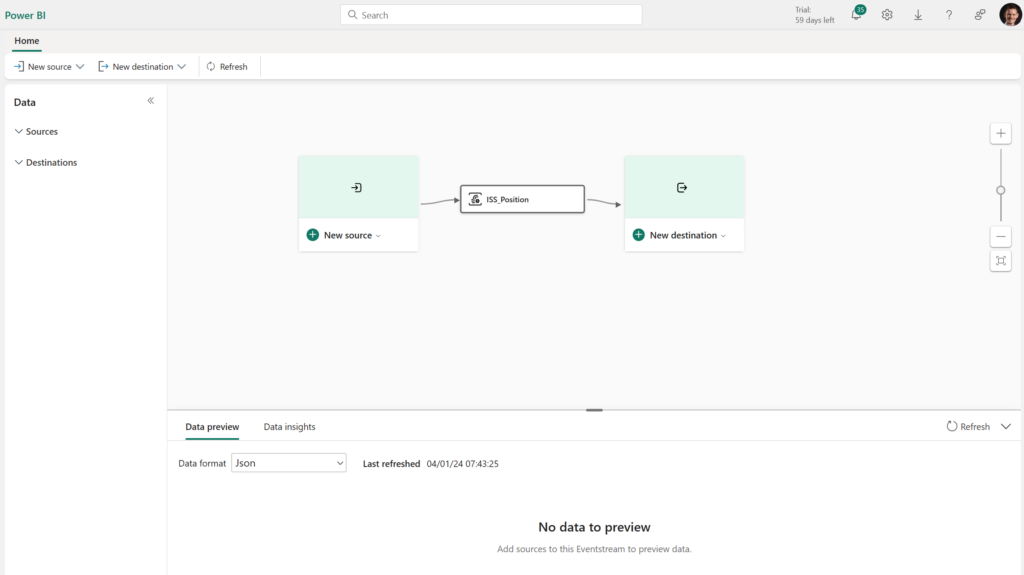
- In the new Workspace, set up an Eventstream resource via “New > More options > Eventstream” and name it “ISS_Position”.
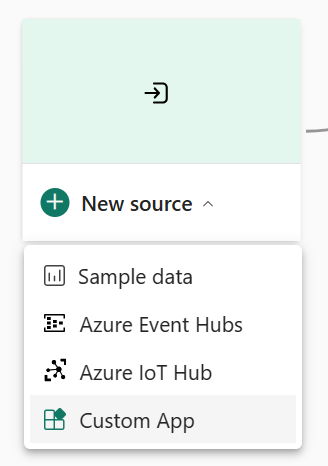
- In your newly created Eventstream, press on “New Source”.
- For the source, select “Custom App”
- Name the source “ISS_Azure_Function”
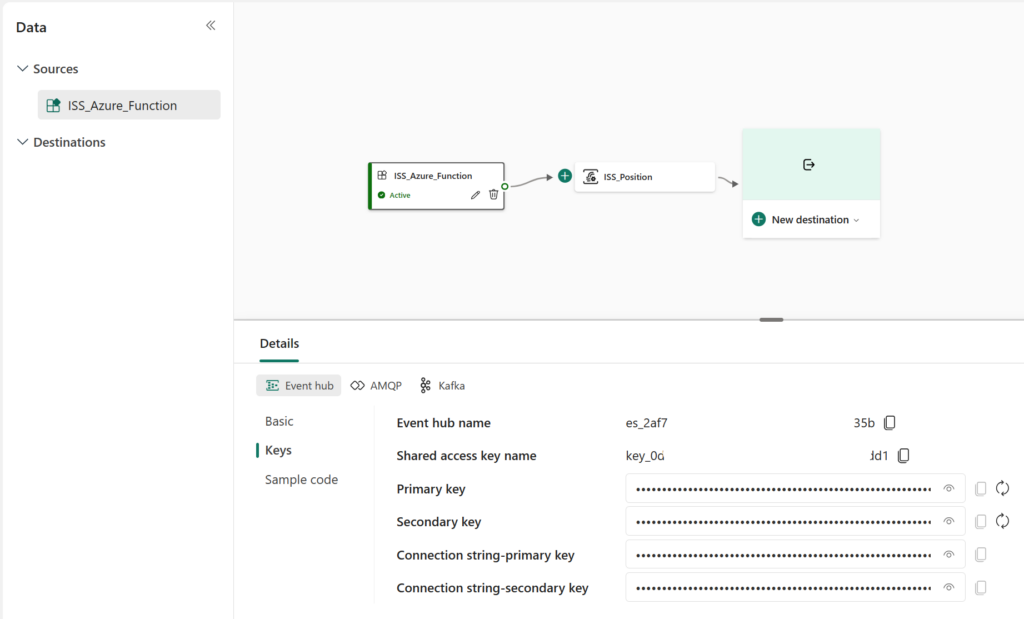
- Select the source and navigate to Details > Keys pane. Here we have everything we need to allow the Azure Function to send data to our Eventstream.
- Take a note of both the “Event hub name” and the “Connection string-primary key”. This will be needed later.
Create the Azure Function
The Azure Function can be created in many ways, for this example we are using VS Code.
- Open a new and empty VS Code Window.
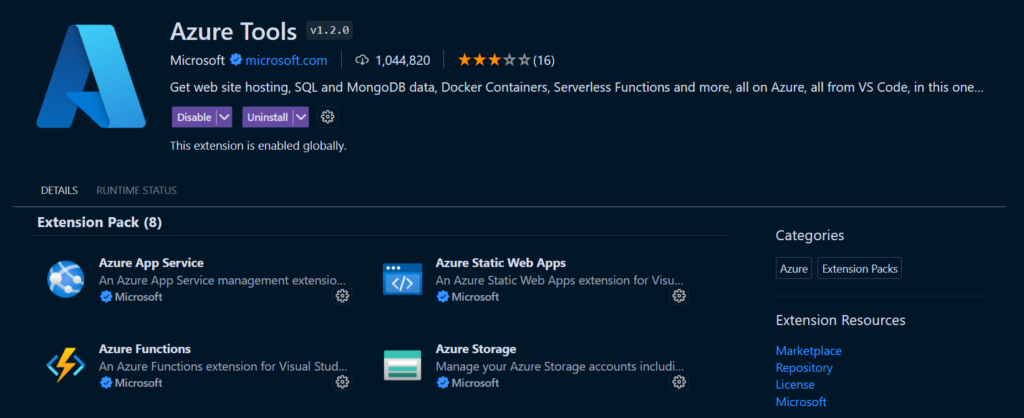
- If you don’t have the Azure Tools extension yet, navigate to the VS Code extensions (Ctrl+Shift+X) and search for “Azure Tools” from Microsoft.
- Navigate to the Azure extension and sign in to Azure with your account.
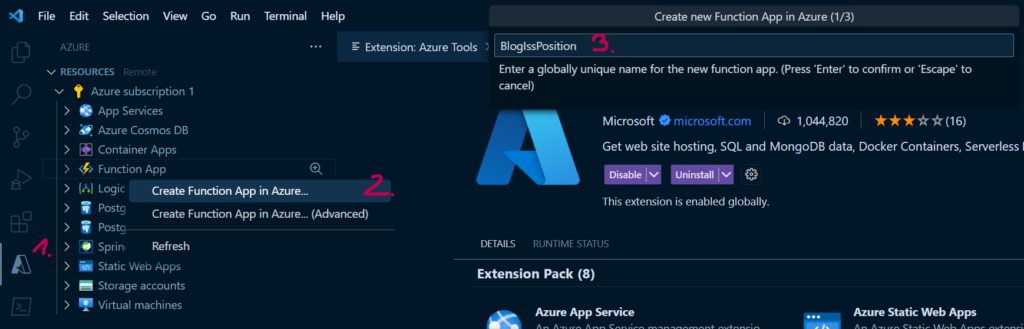
- In the Azure Extension under your subscription, right click on “Function App ” and select “Create a Function App in Azure”.
- Enter a globally unique name for your function, select Python 3.9. as your runtime stack and a location in which you want to host your function.
Note: This sets up everything you need but has less control over which resources are created and how they are named. If you want to have more control, create the resources directly in the Azure Portal.
- Wait until the resource is created and then in VS Code in the Azure Extension on the bottom left at “WORKSPACE”, click on the Azure Functions icon and select “Create Function…”.
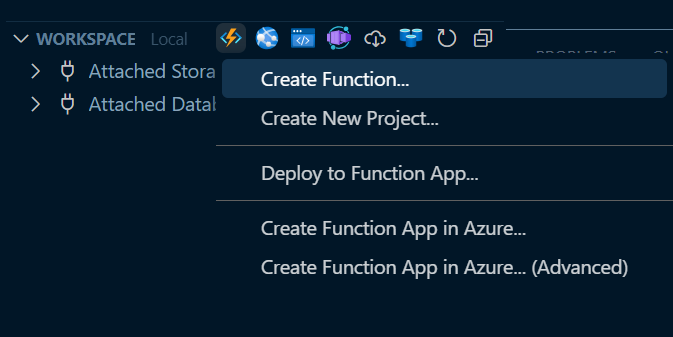
- Select your Folder that will contain your function, you can create an empty one wherever you like
- Select Python, Model V2
- Select your Python 3.9.* Version
- For the Function Template, Select “Skip for now”
- Open in current window
Visual Studio Code is now finishing the setup of your local Function. After it is finished, you should see some files created in your selected folder.
The Code
- Add a new file “function_app.py” in your root folder.
- Add the copy and paste the code below in the “function_app.py” file. This code gets data from an API to get the current position of the ISS. It specifies a timer which runs the function every 10 seconds and sends the result to your event hub.
import logging
import os
import requests
import json
import datetime
import azure.functions as func

url = "http://api.open-notify.org/iss-now.json"

def request_iss_position(url):
    response = requests.get(url)
    return response.text

def transform_iss_data(iss_data_json):
    try:
        iss_data = json.loads(iss_data_json)
        iss_data_timestamp = iss_data["timestamp"]
        iss_data_longitude = float(iss_data["iss_position"]["longitude"])
        iss_data_latitude = float(iss_data["iss_position"]["latitude"])
        iss_event = json.dumps(
                                {
                                    "timestamp": iss_data_timestamp,
                                    "longitude":  iss_data_longitude,
                                    "latitude": iss_data_latitude
                                }
                            )

    except:
        print("could not pars iss_data")
        iss_event = None
    finally:
        return iss_event

app = func.FunctionApp()

@app.function_name(name="get_IssPosition")
@app.schedule(schedule="*/10 * * * * *", arg_name="myTimer", run_on_startup=True)
@app.event_hub_output(arg_name="event",
                      event_hub_name="event_hub_name",
                      connection="connection")
def get_IssPosition(myTimer: func.TimerRequest, event: func.Out[str])-> None :
    utc_timestamp = datetime.datetime.utcnow().replace(tzinfo=datetime.timezone.utc).isoformat()

    if myTimer.past_due:
        logging.info('The timer is past due!')

    data = request_iss_position(url)
    logging.info(f"ISS Data: {data}")
    event.set(transform_iss_data(data))
    logging.info('Python timer trigger function ran at %s', utc_timestamp)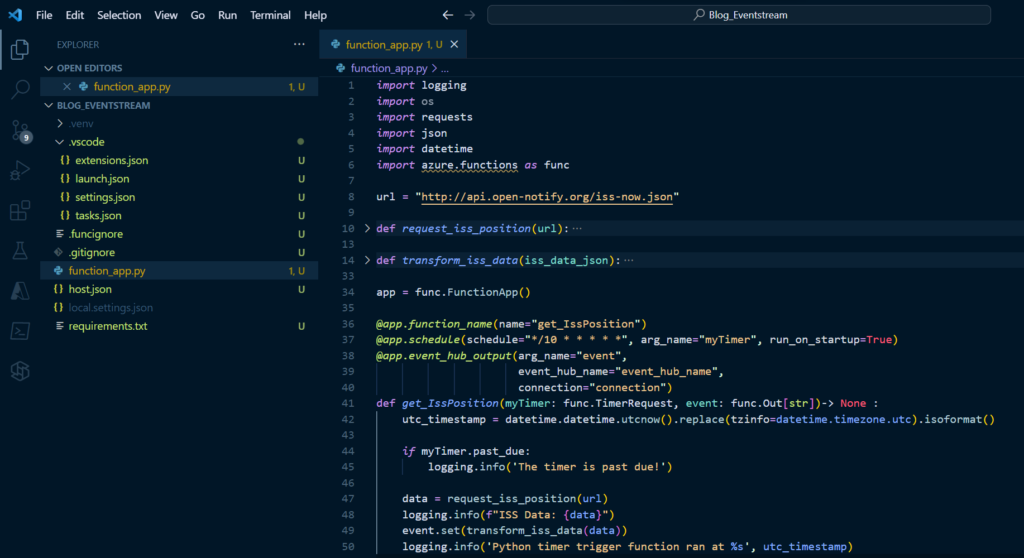
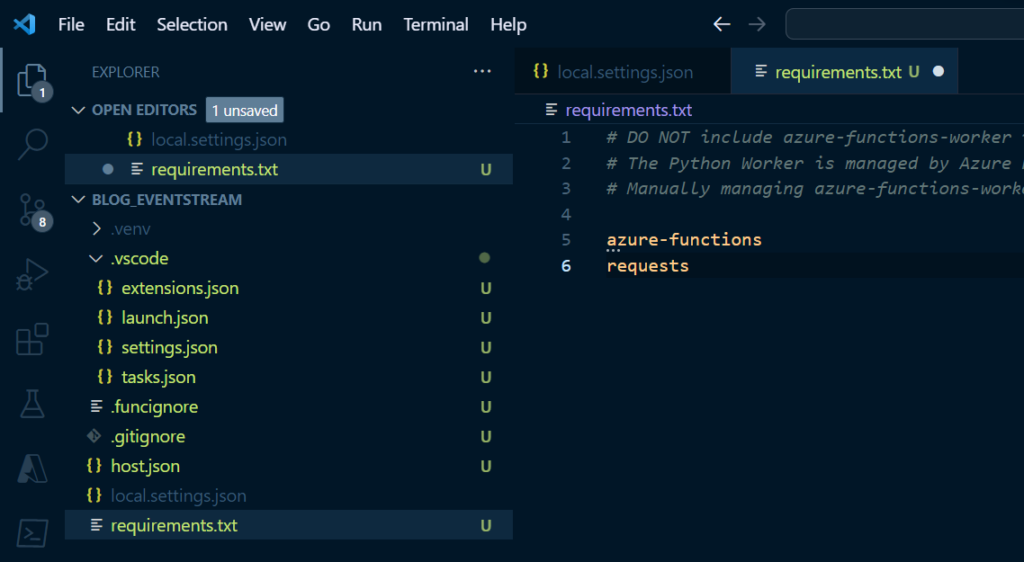
- Because we used the requests library, it needs to be added to the requirements.txt file. Add “requests” to requirements.txt.
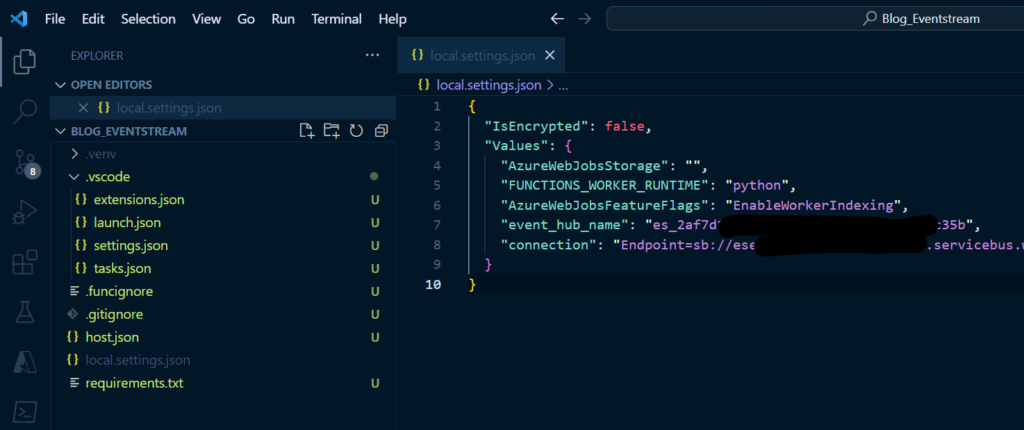
In the code there are two references to variables which the Function is reading either from local.settings.json or from the application settings in Azure, depending on where you run it. If you want to have the ability to run the function locally in Debug mode, in the local.settings.json, add two new entries and copy the values from your Eventstream source (Back in step 7. of chapter “Create A Fabric Workspace with an EventStream”):
- “event hub name”: the name of your event hub
- “connection”: your primary connection string
Deployment
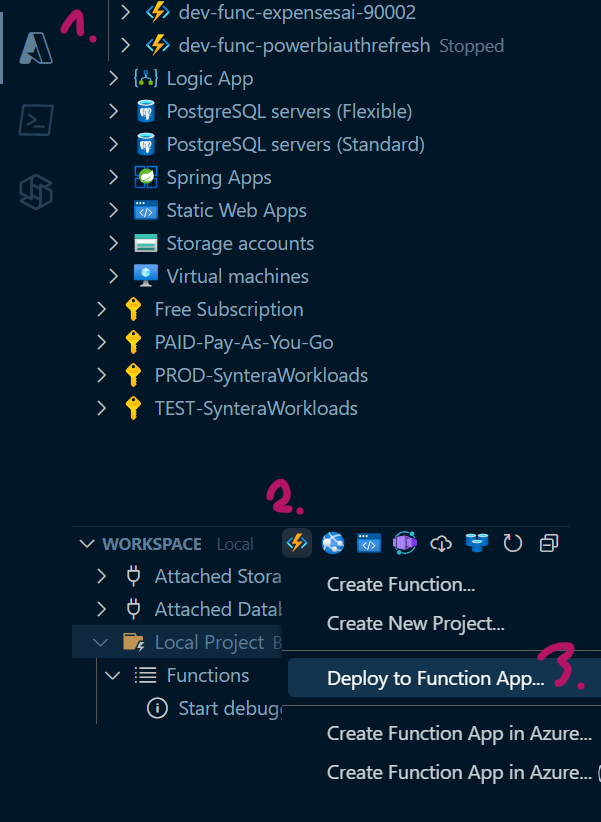
- In VS Code in the Azure Extension on the bottom left at “WORKSPACE”, click on the Azure Functions icon and select “Deploy to Function App”.
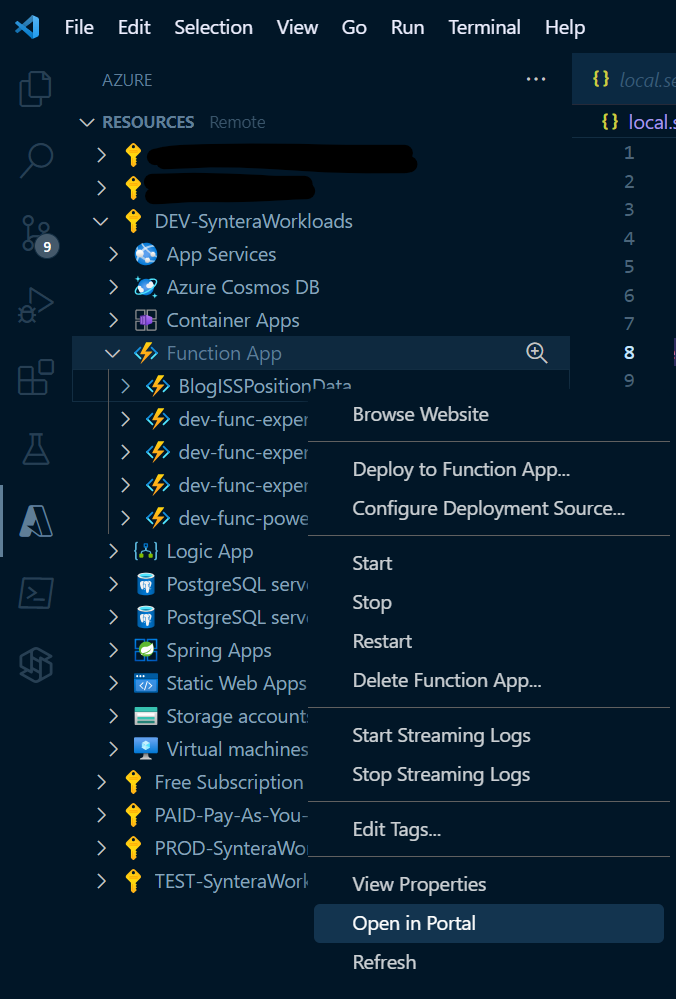
- Navigate to your function App in the Azure Portal via portal.azure.com or via the context menu.
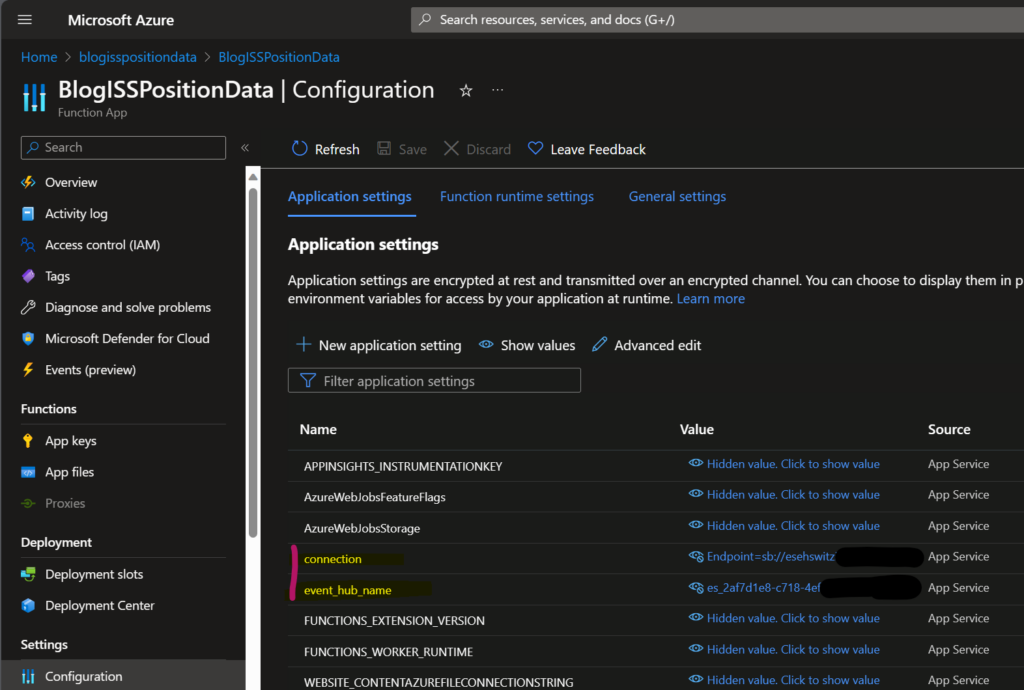
- In your Azure Function under “Configuration”, add two new Application settings and copy the values from your Eventstream source (Back in step 7. of chapter “Create A Fabric Workspace with an EventStream”):
- “event hub name”: the name of your event hub
- “connection”: your primary connection string
Note: It is generally advised to store this information in Key Vault and reference it via the Application Settings. For brevity, this is not included in the blog.
As soon as this configuration is set, you should be able to receive data in your Eventstream.
Add data activator
Note: As of the writing of this blog, Data Activator is still in preview.
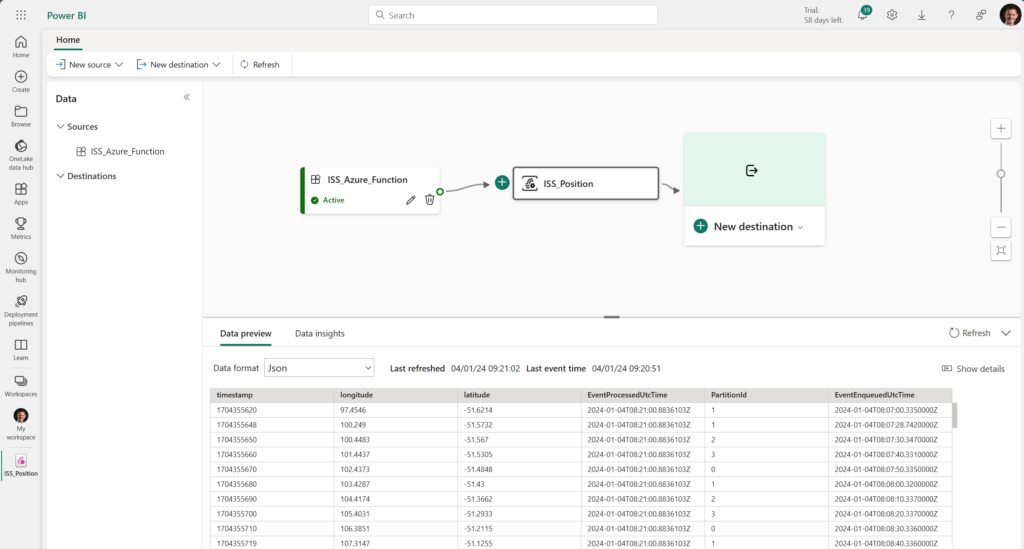
Make sure if your data is streaming before you move further. In you Eventstream, click in the middle element named “ISS_Position”. The data preview should now be populated with the incoming data from your function.
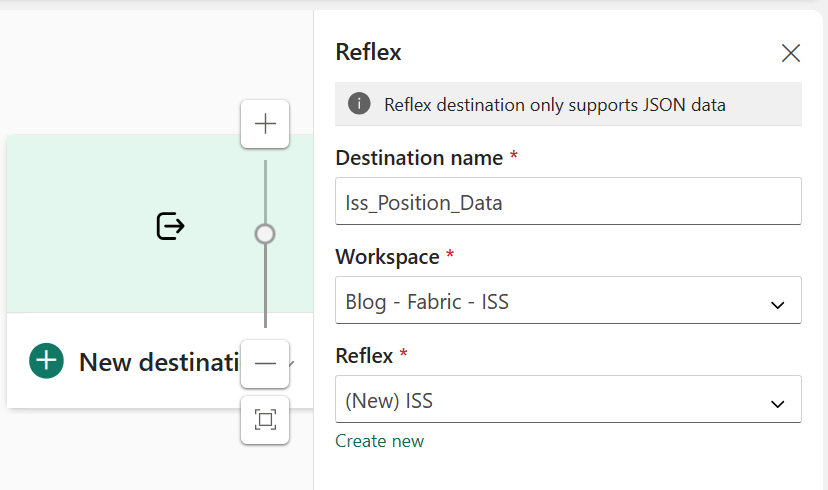
- In your Eventstream Resource, select new Destination > Reflex.
- Open your newly created Reflex Resource.
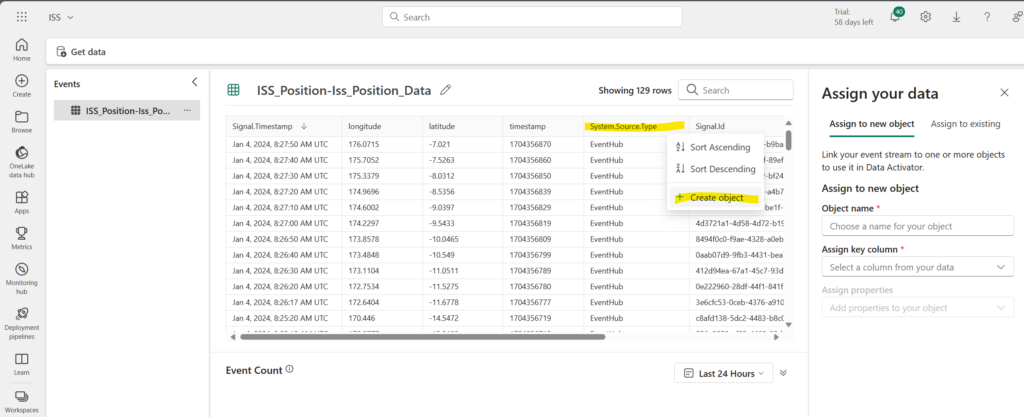
- Create a new Object, select “System.Source.Type” as your ID Column.
- Create a new Trigger and select your Longitute field.
- In “Detect”, choose “Numeric” > “Becomes Greater than” — “5.9564” — “Each Time”.
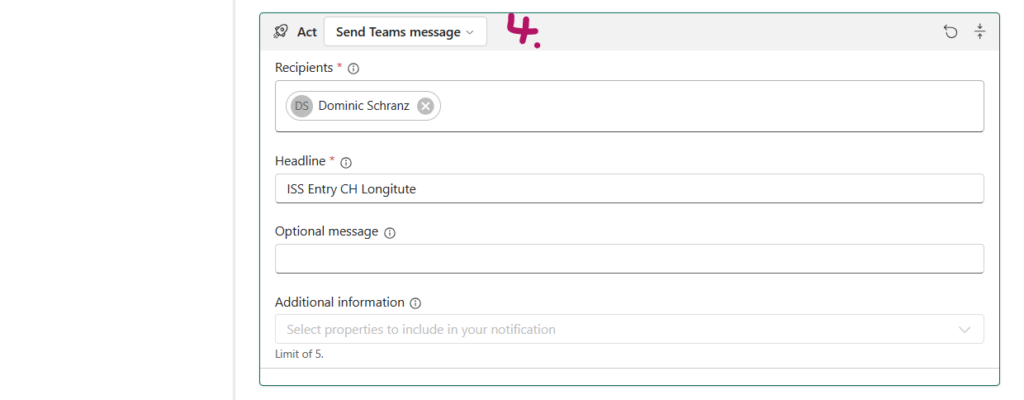
- in Act, choose “Send Teams Message”. If you want to, you can customize the Message.
- Safe the Trigger and test it with “Send me a test alert”.
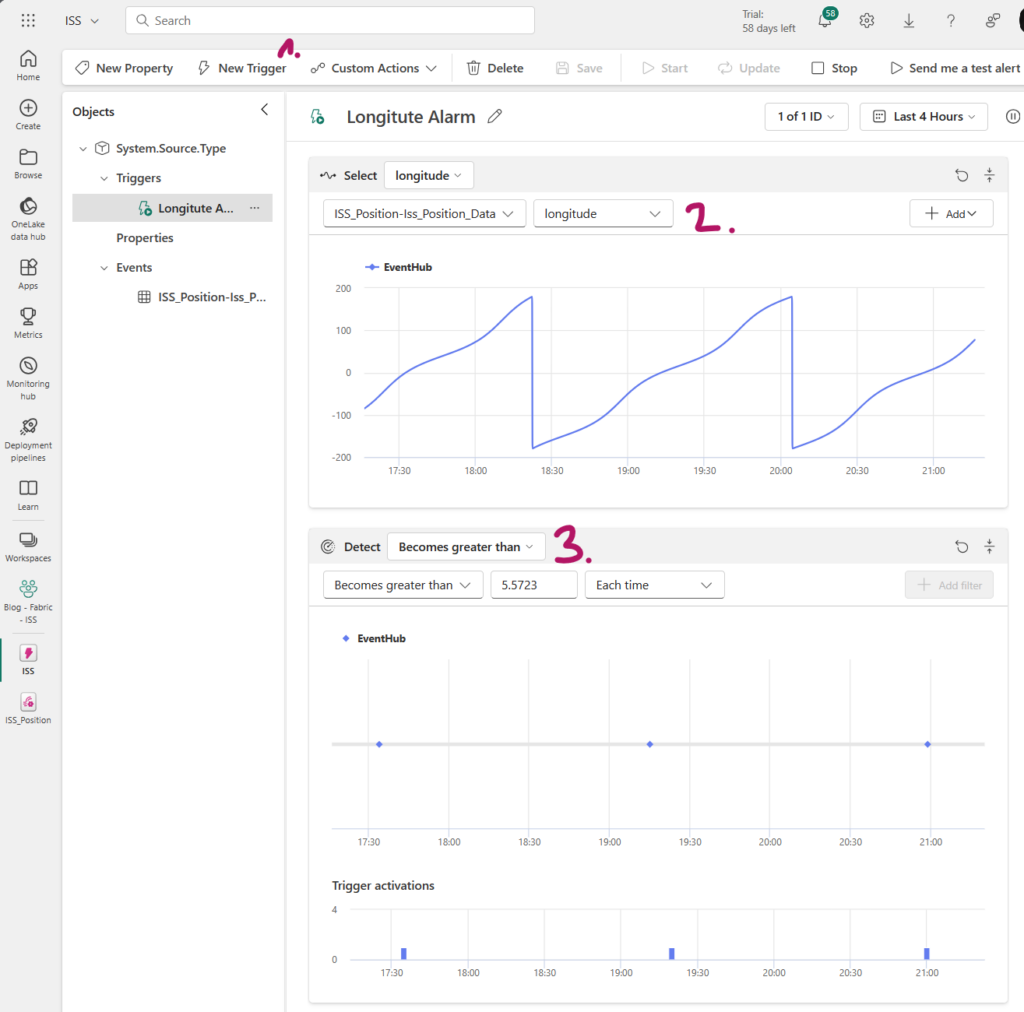
You should now be notified whenever the longitude of the ISS gets above the value of 5.5723. If you can’t see any trigger activations in the detect part, wait for more data to come in or adjust the value for the notification.
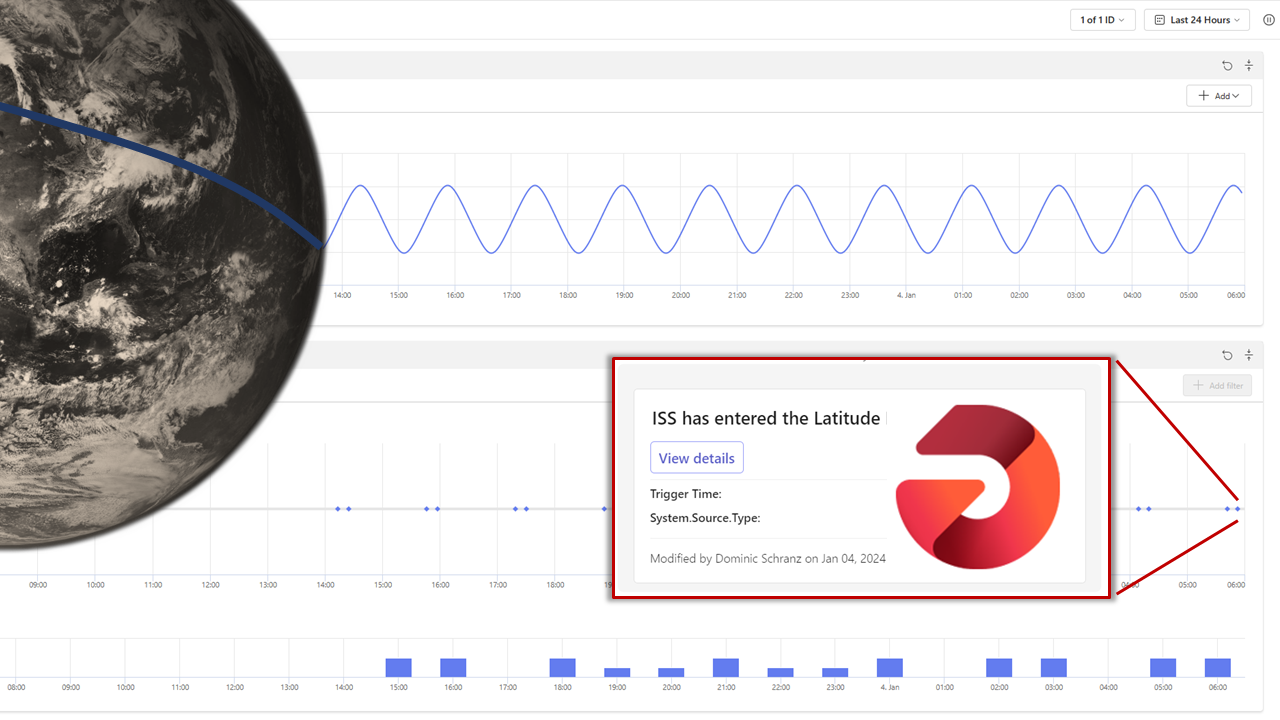
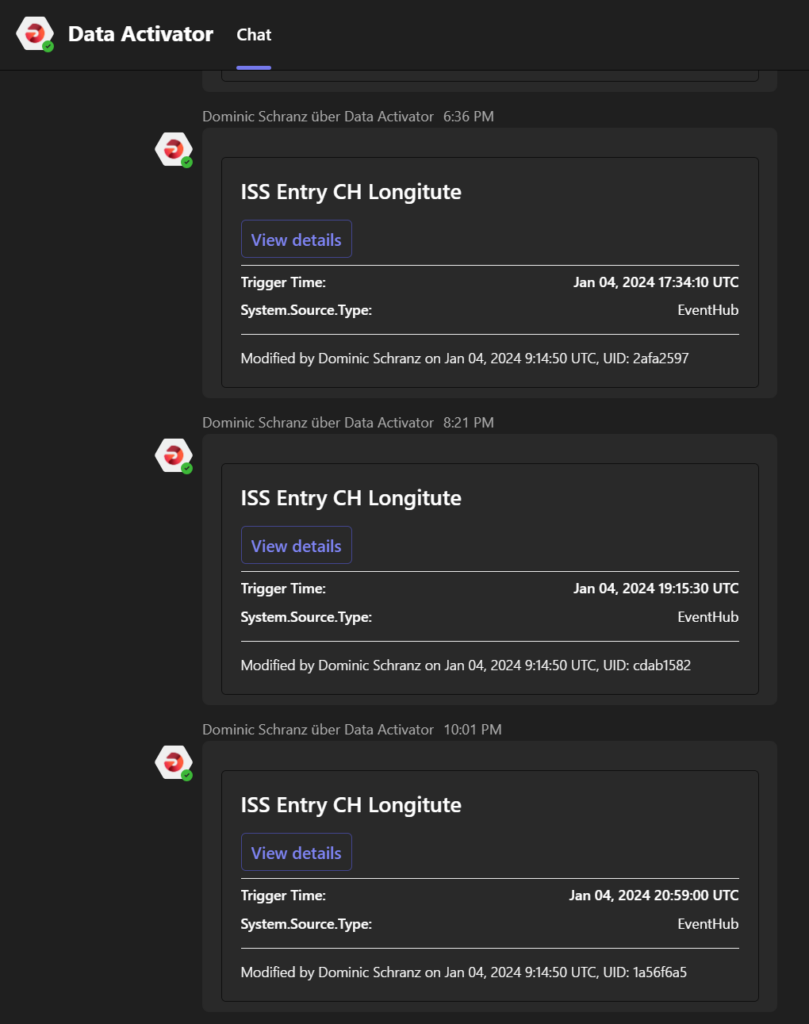
The notification in Teams looks like this:
Clean up
If you have been following along, please make sure to:
- Delete your Azure Resources, best is to delete the whole resource group.
- Delete your Fabric Workspace.
Alternatively, you can stop the Azure Function and restart as soon as you need it. The same works for your paid Fabric Capacity if you are in the pay-as-you-go model. But be aware that this potentially impacts multiple workspaces.

Final Thoughts
Implementing the continuous location tracking of the ISS has highlighted three key insights into working with Eventstream and Data Activator in Fabric. These should serve as practical guidance for your own projects.
Simplified Architecture with Direct Data Feeding
There’s no inherent need to create, maintain, and pay for a dedicated Event Hub to utilize Eventstream in Fabric. The data source itself can act as an Event Hub, allowing you to directly send data to the generated endpoint. This approach not only simplifies your architecture but also helps in reducing costs. While there might be scenarios where a dedicated Event Hub is beneficial, it’s important to understand that it’s not a necessity by default.
Latency Considerations
Consider the latency from the producer of the data to the notification of the user. In the presented case, the average notification time was around 3-4 minutes, with a maximum delay of 6 minutes. This time frame is generally acceptable for many applications, particularly in analytics. However, for situations requiring faster response times, alternative solutions might be more appropriate. It’s important to align the technology with the specific speed requirements of your project.
Leveraging Eventstream’s Analytical Capabilities
Eventstream excels in creating alerts based on aggregated data. Immediate actions triggered by single event thresholds can be efficiently managed directly within Azure Functions, significantly reducing latency. However, remember that these functions typically process events in isolation, without additional context. In contrast, Fabric is geared more towards analytical workloads, offering a comprehensive view across multiple data points. To fully harness the power of streaming data, consider detecting aggregations and tumbling windows across various data points.
More about Fabric: